Monday, July 17, 2017

A FLORAL FOX THEMED SWEET TABLE | WOODLAND PARTY IDEAS


The FOX is one of the latest animal crazes around & is probably why my daughter absolutely loves this animal so much!  So for her birthday this year, I've created this sweet table with my daughters favorite things, the fox, mixing it with the popular woodland theme & girly-fied it with florals.

THEME ELEMENTS:
- Fox printable cut outs
- Florals 
- lots of green leaves
- wooden sticks / wooden plates
- theme inspired desserts


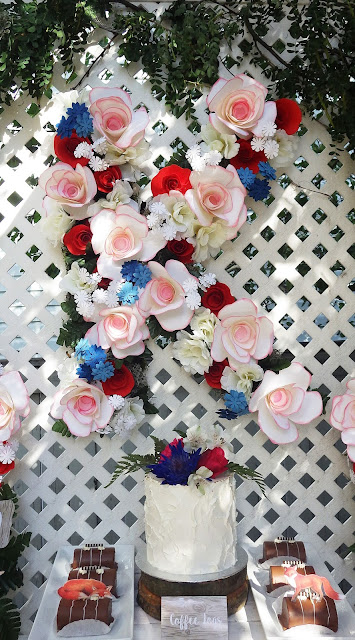
Giant letter "K" monogram


DIY
Tip: Firstly, know where you will be putting your decor, so that you have a plan to hang it.  Luckily for me, I was working with a lattice back drop, so after I cut my card board base, I cut slits & put zip ties through the cardboard. 

1. Start with you card board base, cut into your shape
2.  Decorate (hot glue) with paper flowers, matching to theme colors
3. Hot glue leaves 
4. Hot glue moss to fill in any empty exposed cardboard


CENTERPIECES

-Large printable fox cut outs
-fake leaves from the dollar store
-DIY paper flowers hand cut & flower punched
-tin pot base
-floral foam in base to stick things in


DESSERTS


I wanted to go with a more natural feel for this theme.  For the Cake I wanted a simple rustic styled cake, which I added fresh flowers to (matching colors).

Coffee Cake "logs"


I LOVE sugar cookies and these beautiful fox faced cookies truly helped to complete the theme table.

Macarons are absolutely delicious, so for this, I had my baker match the theme colors.


THANK YOU TABLE


DIY 
1. Regular 8X10 picture frame painted brown
2. Branches measured, cut & hot glued onto frame


THE BIRTHDAY GIRL
For my girl, she had her favorite dress picked out & created her own head piece.
I found the most perfect fox material to create her tail.


Thanks so much & I hope you've been inspired.
Richelle

Monday, June 19, 2017

Nautical Party Printable

Nautical Birthday

Time to get your sea legs ready for this perfect summer celebration!
This printable collection is super duper cute & full of everything you could possibly need for your little ones birthday.

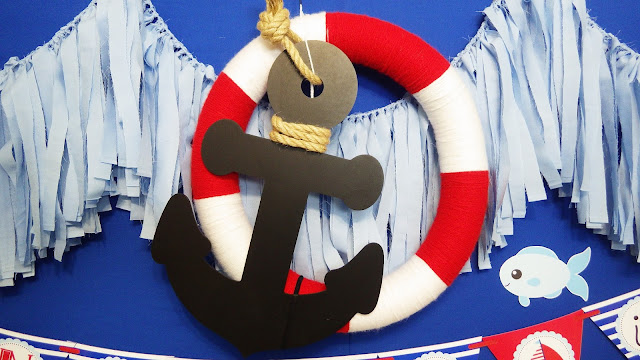
DIY Life Saver Prop 
    Supplies : Pool noodle, yarn & duct tape
    1. Cut your desired length for your prop
    2. Duct tape the ends together to form your shape
    3. wrap it with your chosen colored yarn


Cut outs for Centerpiece or Cake topper

Hershey Bar wrapper + Chocolate Coin labels + Hershey kiss labels

Photo Props

First Birthday Photo Banner & Hi-chair Banner

Dessert Decor
Cupcake toppers & toothpick sails

Table Decor
Cutlery pockets & Food tent labels

Favors
Tags, bag cover & topper for standard resealable bag

Drink Wrappers
Water bottle & juice Box

Party Signs
     RED FRAMES
     Supplies: 8X10 cheap frames from the Dollar store, paint (in this case - red paint), sand paper

     DIY:
     1. remove glass & back
     2. sand frame until 1st layer is gone (until it's not shiny anymore)
     3. clean debris off, wash & pat dry
     4. paint in your colors

     *If you do not plan on keeping the frames, you do not need to sand them.  This is for more of a            permanent solution, so that the paint does not chip in the future.

Tell us what you think!  
Thanks so much for checking us out,

Richelle


Monday, June 5, 2017

Mermaid Dessert Table Set Up


Mermaid Party Ideas
How to set up a simple MERMAID party table that will wow your guests.


1. BACKDROP  
You can use multiple types of material here (ribbon, fabric) but the most cost-effective would be grabbing rolls of plastic table covers, cutting them into strips, then tying each strip onto your string or post that you will be hanging. Almost exaclty like the DIY tutu, just longer - depending on the length that you need.  In our backdrop, we also added some glitter tulle & this touch of dimension made the back drop look so much more beuatiful - & "eh-hem" more expensive than it really was.
2. JELLYFISH
    Found this tutorial on Pinterest! Original article from diyready.com

Made with round paper lanterns & strips of plastic table covers AND hot glue.
Use fishing line to hang, so they look invisible.

3. DESSERTS & PRESENTATION
A few things you need for your set up are
-variations of dessert, usually 3-4 different types is enough
For me I often go with, CAKE, MACARONS & CUPCAKES.  You don't need a lot of each.  I've hosted a party for 80 & went with - 3 dozen full cupcakes, 4 dozen macarons (they're tiny) & a 2 tier cake for 50.  We also provided dinner....but once the dessert was open, there was still plenty left.  I was practically forcing them down my guests throats.....cause I hate to have dessert go to waste, but I also don't want to be the one polishing them off!
-   dimension for set up
If you love to party, some wooden crates would be a great addition to your set up collection.  Keep their colors neutral (original wood or just white), so you can reuse them for every party & not have to worry about storage space.  If you just don't have space for crates to lie around the house until your next event, my recommendation would be to collect some strong boxes (different sizes)  & wrap them in solid colored wrapping paper or fabric.  Then toss after use.

The basic rule for dessert set up is 3 levels. LOW-MEDIUM-HIGH
-So in this mermaid set up, I've used - 
-the table as my low (with the gold plates & macarons)
- some cake stands & small crates as my medium
- and large crates (the cake) as my high    
Now, the only way to save money on desserts is to DIY!  There are tons of ideas on Pinterest that will help you to create some perfect & easy desserts.  Feel free to check out our Mermaid board on Pinterest for more coordinating party ideas!


FOR THE KIDS

No Mermaid party is perfect without Ariel!
Our party was in November (in Canada), so yes there was snow & she rang the doorbell, arrived exactly how you see her.  No coat & from what I saw, no shoes.
She was absolutely wonderful and did not break character for one second!
The kids loved her, they did crafts & she sang her songs perfectly!  Now if you are so lucky to have access to these Princesses, I highly recommend one for your party to complete the magical experience.


For crafts, each child was given a plain treasure box to decorate as they wish & then treasure hunted for little trinkets.


A super easy DIY tutoral for Mermaid tails!
http://www.livinglocurto.com/mermaid-tails-party-craft/


If you're planning a mermaid party, I hope you've been inspired!  You can also check out my Mermaid board on Pinterest for more ideas.

Warmest regards,
Richelle